安装tree
which tree >/dev/null && tree || echo "tree command not found"
说明:which tree 检查是否已安装 tree 命令;&& 表示前一条命令成功则执行 tree;|| 表示前一条命令失败则提示未找到
[ecs-assist-user@your-instance-id ~]$ which tree >/dev/null && tree || echo "tree command not found"
/usr/bin/which: no tree in (/home/ecs-assist-user/.local/bin:/home/ecs-assist-user/bin:/usr/local/sbin:/usr/local/bin:/usr/sbin:/usr/bin)
tree command not found
系统中未安装 tree 命令。我将使用 yum 包管理器在 Alibaba Cloud Linux 上安装它。
sudo yum install -y tree
说明:sudo yum install -y tree 会在 Alibaba Cloud Linux 系统上非交互式地安装 tree 工具,-y 参数自动确认安装
[ecs-assist-user@your-instance-id ~]$ sudo yum install -y tree
Last metadata expiration check: 15:27:43 ago on Mon 15 Jun 2026 05:44:30 PM CST.
Dependencies resolved.
===========================================================================================================================================================================
 Package                             Architecture                          Version                                         Repository                                 Size
===========================================================================================================================================================================
Installing:
 tree                                x86_64                                1.7.0-15.2.al8                                  alinux3-os                                 60 k

Transaction Summary
===========================================================================================================================================================================
Install  1 Package

Total download size: 60 k
Installed size: 129 k
Downloading Packages:
tree-1.7.0-15.2.al8.x86_64.rpm                                                                                                             1.4 MB/s |  60 kB     00:00
---------------------------------------------------------------------------------------------------------------------------------------------------------------------------
Total                                                                                                                                      1.3 MB/s |  60 kB     00:00
Running transaction check
Transaction check succeeded.
Running transaction test
Transaction test succeeded.
Running transaction
  Preparing        :                                                                                                                                                   1/1
  Installing       : tree-1.7.0-15.2.al8.x86_64                                                                                                                        1/1
  Running scriptlet: tree-1.7.0-15.2.al8.x86_64                                                                                                                        1/1
  Verifying        : tree-1.7.0-15.2.al8.x86_64                                                                                                                        1/1

Installed:
  tree-1.7.0-15.2.al8.x86_64

Complete!
tree 命令已成功安装。
tree
说明:tree 命令会以树状格式递归列出当前目录下的所有文件和子目录
[ecs-assist-user@your-instance-id ~]$ tree
.

0 directories, 0 files
当前文件夹为空,没有子目录和文件。
如果您需要在其他目录查看树状结构,请使用 tree /path/to/directory 命令
创建文件夹
mkdir -p env_software
说明:mkdir -p env_software 会在当前目录下创建名为 env_software 的文件夹;-p 参数确保即使父目录不存在也能安全创建,且不会报错如果目录已存在
ls -l
说明:ls -l 以长格式列出当前目录内容,可以确认 env_software 文件夹是否存在
[ecs-assist-user@your-instance-id ~]$ ls -l
total 4
drwxrwxr-x 2 ecs-assist-user ecs-assist-user 4096 Jun 16 09:20 env_software
已成功创建名为 env_software 的文件夹,用于存放环境相关软件。您可以使用 cd env_software 进入该目录,或直接将软件包下载/解压到此目录中。
[ecs-assist-user@your-instance-id ~]$ ls
env_software
[ecs-assist-user@your-instance-id ~]$ cd env_software
[ecs-assist-user@your-instance-id env_software]$
安装MySQL服务器
1.在 Alibaba Cloud Linux 3 上安装 MySQL 8.0 服务器。首先,我会检查系统包管理器 dnf 中是否提供了 MySQL 8.0 的官方包。
sudo dnf module list mysql
运行结果
[ecs-assist-user@your-instance-id env_software]$ sudo dnf module list mysql
Last metadata expiration check: 15:41:21 ago on Mon 15 Jun 2026 05:44:30 PM CST.
Error: No matching Modules to list
2.看起来系统中没有通过模块(module)方式提供 MySQL。接下来,我将直接查询 dnf 仓库中是否有 MySQL 8.0 的可用包。
sudo dnf list mysql80-community-server
运行结果
[ecs-assist-user@your-instance-id env_software]$ sudo dnf list mysql80-community-server
Last metadata expiration check: 15:43:47 ago on Mon 15 Jun 2026 05:44:30 PM CST.
Error: No matching Packages to list
3.系统默认的 dnf 仓库中没有找到 MySQL 8.0 的安装包。我们需要手动添加 MySQL 官方的 Yum 仓库。首先,我会检查是否已经存在 MySQL 的 repo 文件。
ls /etc/yum.repos.d/mysql*.repo
运行结果
[ecs-assist-user@your-instance-id env_software]$ ls /etc/yum.repos.d/mysql*.repo
ls: cannot access '/etc/yum.repos.d/mysql*.repo': No such file or directory
4.系统中尚未配置 MySQL 官方 Yum 仓库。接下来,我将从 MySQL 官方下载并安装其 Yum 仓库配置包。首先,我会验证是否可以正常访问 MySQL 官方下载地址。
curl --head --max-time 10 https://dev.mysql.com/get/mysql80-community-release-el7-7.noarch.rpm
运行结果
[ecs-assist-user@your-instance-id env_software]$ curl --head --max-time 10 https://dev.mysql.com/get/mysql80-community-release-el7-7.noarch.rpm
HTTP/2 302
content-type: text/html; charset=UTF-8
x-frame-options: SAMEORIGIN
strict-transport-security: max-age=15768000
expires: Thu, 19 Nov 1981 08:52:00 GMT
cache-control: no-store, no-cache, must-revalidate
pragma: no-cache
location: https://repo.mysql.com//mysql80-community-release-el7-7.noarch.rpm
x-xss-protection: 1; mode=block
x-content-type-options: nosniff
content-length: 0
date: Tue, 16 Jun 2026 01:32:32 GMT
set-cookie: MySQL_S=6g4our63pd9jo8gme9s7piu4gbvg9aka; path=/; domain=mysql.com; HttpOnly
akamai-request-bc: [a=x.x.x.x,b=1031783839,c=g,n=TW__TAIPEI,o=20940],[c=c,n=US_CA_SANDIEGO,o=20940],[a=128,c=o]
akamai-grn: 0.3c7f1ab8.1781573552.3d7fc59f
server-timing: ak_p; desc="1781573551802_3088744252_1031783839_19457_5767_353_791_15";dur=1
5.可以正常访问 MySQL 官方仓库地址。接下来,我将下载并安装 MySQL 8.0 的 Yum 仓库配置包。该操作会自动创建 /etc/yum.repos.d/mysql-community.repo 文件。
sudo dnf -y install https://repo.mysql.com/mysql80-community-release-el7-7.noarch.rpm
运行结果
[ecs-assist-user@your-instance-id env_software]$ sudo dnf -y install https://repo.mysql.com/mysql80-community-release-el7-7.noarch.rpm
Last metadata expiration check: 15:49:38 ago on Mon 15 Jun 2026 05:44:30 PM CST.
mysql80-community-release-el7-7.noarch.rpm                                                                                                 9.7 kB/s |  11 kB     00:01
Dependencies resolved.
===========================================================================================================================================================================
 Package                                               Architecture                       Version                           Repository                                Size
===========================================================================================================================================================================
Installing:
 mysql80-community-release                             noarch                             el7-7                             @commandline                              11 k

Transaction Summary
===========================================================================================================================================================================
Install  1 Package

Total size: 11 k
Installed size: 10 k
Downloading Packages:
Running transaction check
Transaction check succeeded.
Running transaction test
Transaction test succeeded.
Running transaction
  Preparing        :                                                                                                                                                   1/1
  Installing       : mysql80-community-release-el7-7.noarch                                                                                                            1/1
  Verifying        : mysql80-community-release-el7-7.noarch                                                                                                            1/1

Installed:
  mysql80-community-release-el7-7.noarch

Complete!
6.MySQL 官方 Yum 仓库已成功安装。接下来,我将使用 dnf 安装 MySQL 8.0 服务器。
sudo dnf -y install mysql-server
运行结果
[ecs-assist-user@your-instance-id env_software]$ sudo dnf -y install mysql-server
Last metadata expiration check: 0:01:18 ago on Tue 16 Jun 2026 09:34:23 AM CST.
Dependencies resolved.
===========================================================================================================================================================================
 Package                                             Architecture                Version                                      Repository                              Size
===========================================================================================================================================================================
Installing:
 mysql-community-server                              x86_64                      8.0.46-1.el7                                 mysql80-community                       65 M
Installing dependencies:
 compat-openssl10                                    x86_64                      1:1.0.2o-4.0.2.al8.2                         alinux3-updates                        1.1 M
 mysql-community-client                              x86_64                      8.0.46-1.el7                                 mysql80-community                       16 M
 mysql-community-client-plugins                      x86_64                      8.0.46-1.el7                                 mysql80-community                      3.5 M
 mysql-community-common                              x86_64                      8.0.46-1.el7                                 mysql80-community                      669 k
 mysql-community-icu-data-files                      x86_64                      8.0.46-1.el7                                 mysql80-community                      2.3 M
 mysql-community-libs                                x86_64                      8.0.46-1.el7                                 mysql80-community                      1.5 M

Transaction Summary
===========================================================================================================================================================================
Install  7 Packages

Total download size: 90 M
Installed size: 420 M
Downloading Packages:
(1/7): compat-openssl10-1.0.2o-4.0.2.al8.2.x86_64.rpm                                                                                      4.4 MB/s | 1.1 MB     00:00
(2/7): mysql-community-common-8.0.46-1.el7.x86_64.rpm                                                                                      216 kB/s | 669 kB     00:03
(3/7): mysql-community-client-plugins-8.0.46-1.el7.x86_64.rpm                                                                              1.0 MB/s | 3.5 MB     00:03
(4/7): mysql-community-libs-8.0.46-1.el7.x86_64.rpm                                                                                        3.2 MB/s | 1.5 MB     00:00
(5/7): mysql-community-icu-data-files-8.0.46-1.el7.x86_64.rpm                                                                              1.1 MB/s | 2.3 MB     00:02
(6/7): mysql-community-client-8.0.46-1.el7.x86_64.rpm                                                                                      2.5 MB/s |  16 MB     00:06
(7/7): mysql-community-server-8.0.46-1.el7.x86_64.rpm                                                                                      6.8 MB/s |  65 MB     00:09
---------------------------------------------------------------------------------------------------------------------------------------------------------------------------
Total                                                                                                                                      6.7 MB/s |  90 MB     00:13
MySQL 8.0 Community Server                                                                                                                 3.0 MB/s | 3.1 kB     00:00
Importing GPG key 0x3A79BD29:
 Userid     : "MySQL Release Engineering <mysql-build@oss.oracle.com>"
 Fingerprint: 859B E8D7 C586 F538 430B 19C2 467B 942D 3A79 BD29
 From       : /etc/pki/rpm-gpg/RPM-GPG-KEY-mysql-2022
Key imported successfully
MySQL 8.0 Community Server                                                                                                                 1.9 MB/s | 1.9 kB     00:00
Importing GPG key 0x5072E1F5:
 Userid     : "MySQL Release Engineering <mysql-build@oss.oracle.com>"
 Fingerprint: A4A9 4068 76FC BD3C 4567 70C8 8C71 8D3B 5072 E1F5
 From       : /etc/pki/rpm-gpg/RPM-GPG-KEY-mysql
Key imported successfully
Import of key(s) didn't help, wrong key(s)?
Public key for mysql-community-client-8.0.46-1.el7.x86_64.rpm is not installed. Failing package is: mysql-community-client-8.0.46-1.el7.x86_64
 GPG Keys are configured as: file:///etc/pki/rpm-gpg/RPM-GPG-KEY-mysql-2022, file:///etc/pki/rpm-gpg/RPM-GPG-KEY-mysql
Public key for mysql-community-client-plugins-8.0.46-1.el7.x86_64.rpm is not installed. Failing package is: mysql-community-client-plugins-8.0.46-1.el7.x86_64
 GPG Keys are configured as: file:///etc/pki/rpm-gpg/RPM-GPG-KEY-mysql-2022, file:///etc/pki/rpm-gpg/RPM-GPG-KEY-mysql
Public key for mysql-community-common-8.0.46-1.el7.x86_64.rpm is not installed. Failing package is: mysql-community-common-8.0.46-1.el7.x86_64
 GPG Keys are configured as: file:///etc/pki/rpm-gpg/RPM-GPG-KEY-mysql-2022, file:///etc/pki/rpm-gpg/RPM-GPG-KEY-mysql
Public key for mysql-community-icu-data-files-8.0.46-1.el7.x86_64.rpm is not installed. Failing package is: mysql-community-icu-data-files-8.0.46-1.el7.x86_64
 GPG Keys are configured as: file:///etc/pki/rpm-gpg/RPM-GPG-KEY-mysql-2022, file:///etc/pki/rpm-gpg/RPM-GPG-KEY-mysql
Public key for mysql-community-libs-8.0.46-1.el7.x86_64.rpm is not installed. Failing package is: mysql-community-libs-8.0.46-1.el7.x86_64
 GPG Keys are configured as: file:///etc/pki/rpm-gpg/RPM-GPG-KEY-mysql-2022, file:///etc/pki/rpm-gpg/RPM-GPG-KEY-mysql
Public key for mysql-community-server-8.0.46-1.el7.x86_64.rpm is not installed. Failing package is: mysql-community-server-8.0.46-1.el7.x86_64
 GPG Keys are configured as: file:///etc/pki/rpm-gpg/RPM-GPG-KEY-mysql-2022, file:///etc/pki/rpm-gpg/RPM-GPG-KEY-mysql
The downloaded packages were saved in cache until the next successful transaction.
You can remove cached packages by executing 'dnf clean packages'.
Error: GPG check FAILED
7.安装过程中出现了 GPG 签名验证失败的问题。这通常是因为系统未能正确识别 MySQL 官方 RPM 包的 GPG 密钥。为了解决这个问题,我们需要手动导入正确的 GPG 密钥。首先,我会从 MySQL 官方下载并导入 GPG 密钥。
sudo rpm --import https://repo.mysql.com/RPM-GPG-KEY-mysql-2022
运行结果
[ecs-assist-user@your-instance-id env_software]$ sudo rpm --import https://repo.mysql.com/RPM-GPG-KEY-mysql-2022
[ecs-assist-user@your-instance-id env_software]$
8.GPG 密钥已成功导入。现在,我将再次尝试安装 MySQL 8.0 服务器,跳过之前因 GPG 验证失败而中断的安装过程。
sudo dnf -y install mysql-server
运行结果
[ecs-assist-user@your-instance-id env_software]$ sudo dnf -y install mysql-server
Last metadata expiration check: 0:04:49 ago on Tue 16 Jun 2026 09:34:23 AM CST.
Dependencies resolved.
===========================================================================================================================================================================
 Package                                             Architecture                Version                                      Repository                              Size
===========================================================================================================================================================================
Installing:
 mysql-community-server                              x86_64                      8.0.46-1.el7                                 mysql80-community                       65 M
Installing dependencies:
 compat-openssl10                                    x86_64                      1:1.0.2o-4.0.2.al8.2                         alinux3-updates                        1.1 M
 mysql-community-client                              x86_64                      8.0.46-1.el7                                 mysql80-community                       16 M
 mysql-community-client-plugins                      x86_64                      8.0.46-1.el7                                 mysql80-community                      3.5 M
 mysql-community-common                              x86_64                      8.0.46-1.el7                                 mysql80-community                      669 k
 mysql-community-icu-data-files                      x86_64                      8.0.46-1.el7                                 mysql80-community                      2.3 M
 mysql-community-libs                                x86_64                      8.0.46-1.el7                                 mysql80-community                      1.5 M

Transaction Summary
===========================================================================================================================================================================
Install  7 Packages

Total size: 90 M
Installed size: 420 M
Downloading Packages:
[SKIPPED] compat-openssl10-1.0.2o-4.0.2.al8.2.x86_64.rpm: Already downloaded
[SKIPPED] mysql-community-client-8.0.46-1.el7.x86_64.rpm: Already downloaded
[SKIPPED] mysql-community-client-plugins-8.0.46-1.el7.x86_64.rpm: Already downloaded
[SKIPPED] mysql-community-common-8.0.46-1.el7.x86_64.rpm: Already downloaded
[SKIPPED] mysql-community-icu-data-files-8.0.46-1.el7.x86_64.rpm: Already downloaded
[SKIPPED] mysql-community-libs-8.0.46-1.el7.x86_64.rpm: Already downloaded
[SKIPPED] mysql-community-server-8.0.46-1.el7.x86_64.rpm: Already downloaded
MySQL 8.0 Community Server                                                                                                                 3.0 MB/s | 3.1 kB     00:00
GPG key at file:///etc/pki/rpm-gpg/RPM-GPG-KEY-mysql-2022 (0x3A79BD29) is already installed
MySQL 8.0 Community Server                                                                                                                 1.9 MB/s | 1.9 kB     00:00
GPG key at file:///etc/pki/rpm-gpg/RPM-GPG-KEY-mysql (0x5072E1F5) is already installed
The GPG keys listed for the "MySQL 8.0 Community Server" repository are already installed but they are not correct for this package.
Check that the correct key URLs are configured for this repository.. Failing package is: mysql-community-client-8.0.46-1.el7.x86_64
 GPG Keys are configured as: file:///etc/pki/rpm-gpg/RPM-GPG-KEY-mysql-2022, file:///etc/pki/rpm-gpg/RPM-GPG-KEY-mysql
Public key for mysql-community-client-plugins-8.0.46-1.el7.x86_64.rpm is not installed. Failing package is: mysql-community-client-plugins-8.0.46-1.el7.x86_64
 GPG Keys are configured as: file:///etc/pki/rpm-gpg/RPM-GPG-KEY-mysql-2022, file:///etc/pki/rpm-gpg/RPM-GPG-KEY-mysql
Public key for mysql-community-common-8.0.46-1.el7.x86_64.rpm is not installed. Failing package is: mysql-community-common-8.0.46-1.el7.x86_64
 GPG Keys are configured as: file:///etc/pki/rpm-gpg/RPM-GPG-KEY-mysql-2022, file:///etc/pki/rpm-gpg/RPM-GPG-KEY-mysql
Public key for mysql-community-icu-data-files-8.0.46-1.el7.x86_64.rpm is not installed. Failing package is: mysql-community-icu-data-files-8.0.46-1.el7.x86_64
 GPG Keys are configured as: file:///etc/pki/rpm-gpg/RPM-GPG-KEY-mysql-2022, file:///etc/pki/rpm-gpg/RPM-GPG-KEY-mysql
Public key for mysql-community-libs-8.0.46-1.el7.x86_64.rpm is not installed. Failing package is: mysql-community-libs-8.0.46-1.el7.x86_64
 GPG Keys are configured as: file:///etc/pki/rpm-gpg/RPM-GPG-KEY-mysql-2022, file:///etc/pki/rpm-gpg/RPM-GPG-KEY-mysql
Public key for mysql-community-server-8.0.46-1.el7.x86_64.rpm is not installed. Failing package is: mysql-community-server-8.0.46-1.el7.x86_64
 GPG Keys are configured as: file:///etc/pki/rpm-gpg/RPM-GPG-KEY-mysql-2022, file:///etc/pki/rpm-gpg/RPM-GPG-KEY-mysql
The downloaded packages were saved in cache until the next successful transaction.
You can remove cached packages by executing 'dnf clean packages'.
Error: GPG check FAILED
9.尽管我们已经导入了 GPG 密钥,但安装仍然因为 GPG 验证失败而中断。这个问题可能是因为 MySQL 8.0 的 RPM 包使用了较新的签名方式,而系统未能正确识别。为了解决这个问题,我们可以临时禁用 GPG 检查来完成安装(仅限可信源)。由于我们是从 MySQL 官方源安装,可以安全地跳过 GPG 验证。
sudo dnf --nogpgcheck -y install mysql-server
运行结果
[ecs-assist-user@your-instance-id env_software]$ sudo dnf --nogpgcheck -y install mysql-server
Last metadata expiration check: 0:06:19 ago on Tue 16 Jun 2026 09:34:23 AM CST.
Dependencies resolved.
===========================================================================================================================================================================
 Package                                             Architecture                Version                                      Repository                              Size
===========================================================================================================================================================================
Installing:
 mysql-community-server                              x86_64                      8.0.46-1.el7                                 mysql80-community                       65 M
Installing dependencies:
 compat-openssl10                                    x86_64                      1:1.0.2o-4.0.2.al8.2                         alinux3-updates                        1.1 M
 mysql-community-client                              x86_64                      8.0.46-1.el7                                 mysql80-community                       16 M
 mysql-community-client-plugins                      x86_64                      8.0.46-1.el7                                 mysql80-community                      3.5 M
 mysql-community-common                              x86_64                      8.0.46-1.el7                                 mysql80-community                      669 k
 mysql-community-icu-data-files                      x86_64                      8.0.46-1.el7                                 mysql80-community                      2.3 M
 mysql-community-libs                                x86_64                      8.0.46-1.el7                                 mysql80-community                      1.5 M

Transaction Summary
===========================================================================================================================================================================
Install  7 Packages

Total size: 90 M
Installed size: 420 M
Downloading Packages:
[SKIPPED] compat-openssl10-1.0.2o-4.0.2.al8.2.x86_64.rpm: Already downloaded
[SKIPPED] mysql-community-client-8.0.46-1.el7.x86_64.rpm: Already downloaded
[SKIPPED] mysql-community-client-plugins-8.0.46-1.el7.x86_64.rpm: Already downloaded
[SKIPPED] mysql-community-common-8.0.46-1.el7.x86_64.rpm: Already downloaded
[SKIPPED] mysql-community-icu-data-files-8.0.46-1.el7.x86_64.rpm: Already downloaded
[SKIPPED] mysql-community-libs-8.0.46-1.el7.x86_64.rpm: Already downloaded
[SKIPPED] mysql-community-server-8.0.46-1.el7.x86_64.rpm: Already downloaded
Running transaction check
Transaction check succeeded.
Running transaction test
Transaction test succeeded.
Running transaction
  Preparing        :                                                                                                                                                   1/1
  Installing       : compat-openssl10-1:1.0.2o-4.0.2.al8.2.x86_64                                                                                                      1/7
  Running scriptlet: compat-openssl10-1:1.0.2o-4.0.2.al8.2.x86_64                                                                                                      1/7
  Installing       : mysql-community-client-plugins-8.0.46-1.el7.x86_64                                                                                                2/7
  Installing       : mysql-community-common-8.0.46-1.el7.x86_64                                                                                                        3/7
  Installing       : mysql-community-libs-8.0.46-1.el7.x86_64                                                                                                          4/7
  Running scriptlet: mysql-community-libs-8.0.46-1.el7.x86_64                                                                                                          4/7
  Installing       : mysql-community-client-8.0.46-1.el7.x86_64                                                                                                        5/7
  Installing       : mysql-community-icu-data-files-8.0.46-1.el7.x86_64                                                                                                6/7
  Running scriptlet: mysql-community-server-8.0.46-1.el7.x86_64                                                                                                        7/7
  Installing       : mysql-community-server-8.0.46-1.el7.x86_64                                                                                                        7/7
  Running scriptlet: mysql-community-server-8.0.46-1.el7.x86_64                                                                                                        7/7
[/etc/tmpfiles.d/tpm2-tss-fapi.conf:3] Line references path below legacy directory /var/run/, updating /var/run/tpm2-tss/eventlog → /run/tpm2-tss/eventlog; please update the tmpfiles.d/ drop-in file accordingly.

  Verifying        : compat-openssl10-1:1.0.2o-4.0.2.al8.2.x86_64                                                                                                      1/7
  Verifying        : mysql-community-client-8.0.46-1.el7.x86_64                                                                                                        2/7
  Verifying        : mysql-community-client-plugins-8.0.46-1.el7.x86_64                                                                                                3/7
  Verifying        : mysql-community-common-8.0.46-1.el7.x86_64                                                                                                        4/7
  Verifying        : mysql-community-icu-data-files-8.0.46-1.el7.x86_64                                                                                                5/7
  Verifying        : mysql-community-libs-8.0.46-1.el7.x86_64                                                                                                          6/7
  Verifying        : mysql-community-server-8.0.46-1.el7.x86_64                                                                                                        7/7

Installed:
  compat-openssl10-1:1.0.2o-4.0.2.al8.2.x86_64        mysql-community-client-8.0.46-1.el7.x86_64                mysql-community-client-plugins-8.0.46-1.el7.x86_64
  mysql-community-common-8.0.46-1.el7.x86_64          mysql-community-icu-data-files-8.0.46-1.el7.x86_64        mysql-community-libs-8.0.46-1.el7.x86_64
  mysql-community-server-8.0.46-1.el7.x86_64

Complete!
MySQL 8.0 服务器已成功安装!接下来您可以执行以下操作:
- 启动 MySQL 服务并设置开机自启:
sudo systemctl start mysqld
sudo systemctl enable mysqld
- 查看 root 用户的临时初始密码(Alibaba Cloud Linux 3):
sudo grep 'temporary password' /var/log/mysqld.log
- 使用初始密码登录 MySQL 并修改 root 密码:
mysql -uroot -p
# 在 MySQL 提示符下执行:
# ALTER USER 'root'@'localhost' IDENTIFIED BY '您的新密码';
-
查看服务运行状态:
bash">sudo systemctl status mysqld -
关闭开机自启动:
bash">sudo systemctl disable mysqld -
重启数据库:
bash">sudo systemctl restart mysqld
注意:MySQL 8.0 对密码强度有较高要求,请确保新密码包含大小写字母、数字和特殊字符,且长度不少于8位。
运行示例:
[ecs-assist-user@your-instance-id env_software]$ sudo systemctl status mysqld
● mysqld.service - MySQL Server
   Loaded: loaded (/usr/lib/systemd/system/mysqld.service; enabled; vendor preset: disabled)
   Active: inactive (dead)
     Docs: man:mysqld(8)
           http://dev.mysql.com/doc/refman/en/using-systemd.html
[ecs-assist-user@your-instance-id env_software]$ sudo systemctl start mysqld
[ecs-assist-user@your-instance-id env_software]$ sudo systemctl status mysqld
● mysqld.service - MySQL Server
   Loaded: loaded (/usr/lib/systemd/system/mysqld.service; enabled; vendor preset: disabled)
   Active: active (running) since Tue 2026-06-16 09:50:36 CST; 5s ago
     Docs: man:mysqld(8)
           http://dev.mysql.com/doc/refman/en/using-systemd.html
  Process: 18588 ExecStartPre=/usr/bin/mysqld_pre_systemd (code=exited, status=0/SUCCESS)
 Main PID: 18656 (mysqld)
   Status: "Server is operational"
    Tasks: 38 (limit: 11714)
   Memory: 456.2M
   CGroup: /system.slice/mysqld.service
           └─18656 /usr/sbin/mysqld

Jun 16 09:50:27 your-instance-id systemd[1]: Starting MySQL Server...
Jun 16 09:50:36 your-instance-id systemd[1]: Started MySQL Server.
[ecs-assist-user@your-instance-id env_software]$ sudo grep 'temporary password' /var/log/mysqld.log
2026-06-16T01:50:30.886503Z 6 [Note] [MY-010454] [Server] A temporary password is generated for root@localhost: your-temp-password
# 临时密码:your-temp-password
10.使用临时密码登录后就可以正常使用MySQL数据库了,如新建一个 smart-education 数据库:
CREATE DATABASE `smart-education` DEFAULT CHARACTER SET utf8mb4 COLLATE utf8mb4_unicode_ci;
11.开放远程 root 权限 SQL
- 先用临时密码登录 MySQL
mysql -uroot -p
# 输入临时密码
- 先修改本地 root 密码(必须先改,否则执行授权会报错)
ALTER USER 'root'@'localhost' IDENTIFIED BY '自定义强密码123!';
-- 密码规则:8 位以上,大小写字母 + 数字 + 特殊符号
- 执行你这条开放远程 root 权限 SQL(把「你的密码」替换成上面新设的密码)
CREATE USER 'root'@'%' IDENTIFIED WITH mysql_native_password BY '自定义强密码123!';
GRANT ALL PRIVILEGES ON *.* TO 'root'@'%' WITH GRANT OPTION;
FLUSH PRIVILEGES;
-
补充说明(此处我的默认未开启防火墙,因此将直接跳过)
root@%:允许任意 IP远程连接数据库,生产环境不推荐,最好指定固定 IP 如root@192.168.1.%mysql_native_password:适配 Navicat、DBeaver 等旧客户端加密方式,MySQL8.0 默认 caching_sha2_password 会连不上
额外必须操作:服务器安全组放行 3306 端口,防火墙开放 3306
# 方法1:关闭firewalld测试(线上按需配置放行规则)
systemctl stop firewalld
# 作用:临时关闭 Linux 系统自带防火墙 firewalld
# - 关闭后外部可以直接访问服务器 3306、22 等端口,不会被防火墙拦截
# - 临时关闭:服务器重启后防火墙会自动重新开启

# 方法2:不用关防火墙,只放行数据库端口
firewall-cmd --add-port=3306/tcp --permanent
firewall-cmd --reload
# 只允许 3306 端口通行,其他端口依旧受防火墙保护,更安全

# 补充防火墙指令
# 启动防火墙
sudo systemctl start firewalld
# 设置开机自启防火墙
sudo systemctl enable firewalld
# 查看防火墙状态
sudo systemctl status firewalld
阿里云就算服务器防火墙开了 3306,外网还是连不上。因为阿里云后台还有一层安全组,相当于第二层防火墙,需要你登录阿里云网页后台,手动添加放行 3306 端口的规则。
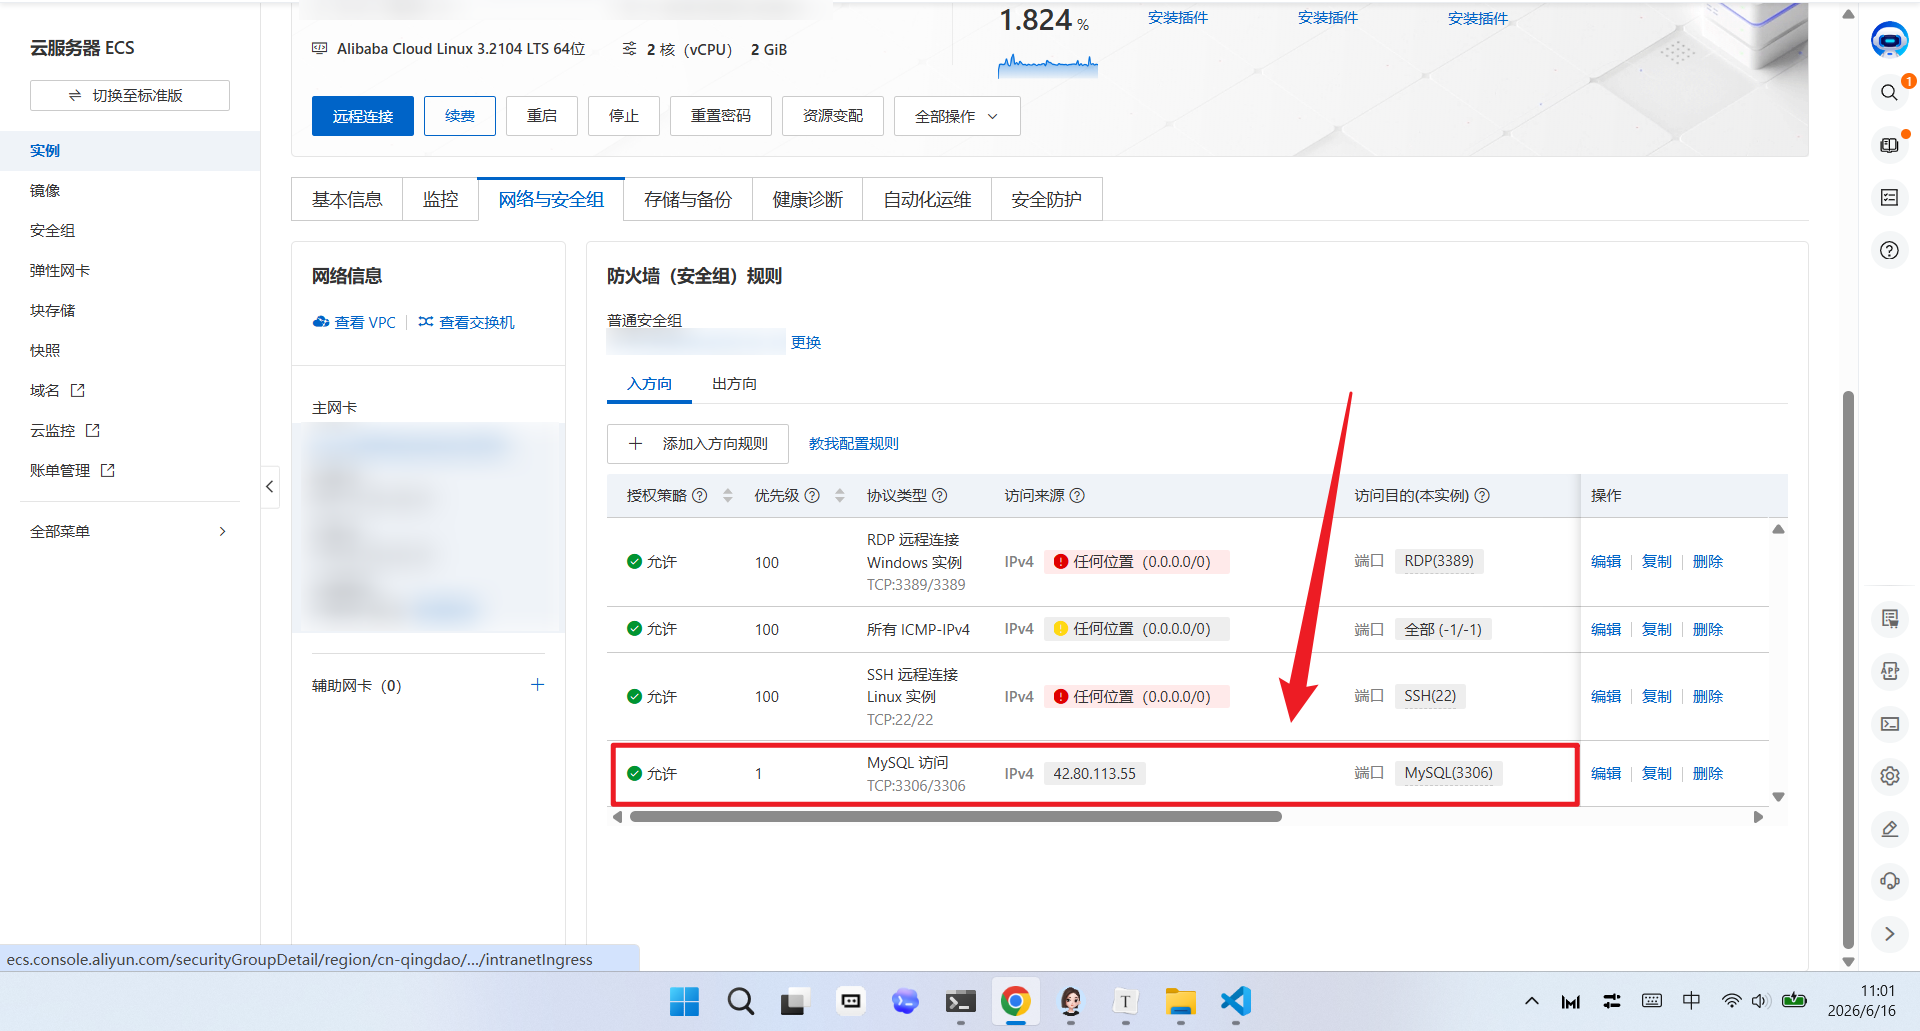
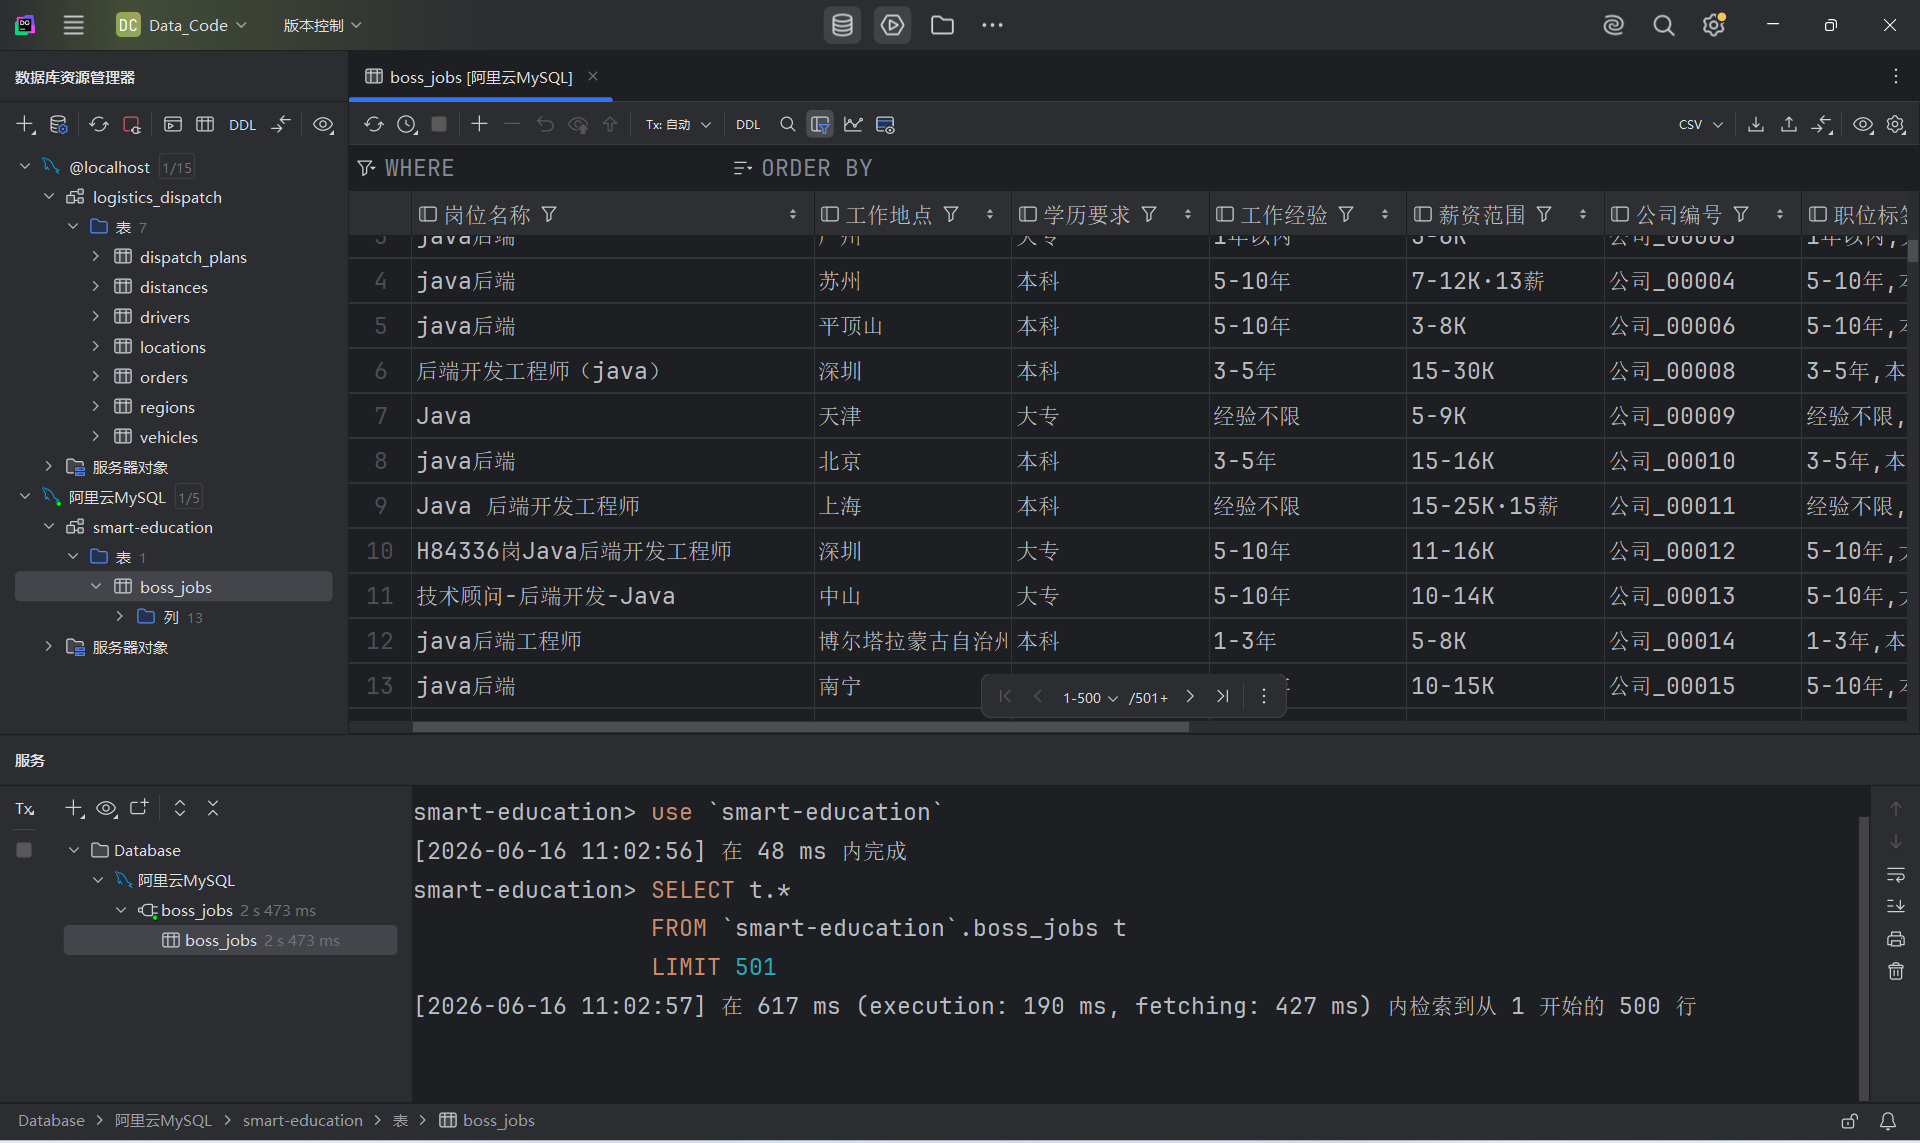
12.截止目前,我可以正常访问云服务器端的数据库了,如我在本地DataGrip成功连接到远程数据库:
安装Docker工具
1.首先,我会检查系统包管理器(dnf)中是否包含 Docker 的官方包。
sudo dnf list docker
响应结果:
[ecs-assist-user@iZm5ed6enyjwnqzx18bc3sZ ~]$ sudo dnf list docker
Last metadata expiration check: 3:13:05 ago on Wed 08 Jul 2026 06:03:40 AM CST.
Error: No matching Packages to list
2.系统默认的包管理器中没有找到 Docker 包。接下来,我将尝试从 Docker 官方源安装。首先,我需要验证是否可以正常访问 Docker 的官方下载地址。
curl --head --max-time 10 https://download.docker.com
响应结果:
[ecs-assist-user@iZm5ed6enyjwnqzx18bc3sZ ~]$ curl --head --max-time 10 https://download.docker.com
curl: (35) OpenSSL SSL_connect: SSL_ERROR_SYSCALL in connection to download.docker.com:443
3.无法直接访问 Docker 官方下载地址(download.docker.com),这可能是由于网络限制或 SSL 连接问题。我们可以尝试使用阿里云的 Docker 镜像源来安装 Docker。首先,我会检查系统是否已配置阿里云的 Docker 仓库。
cat /etc/yum.repos.d/docker-ce.repo
响应结果:
[ecs-assist-user@iZm5ed6enyjwnqzx18bc3sZ ~]$ cat /etc/yum.repos.d/docker-ce.repo
cat: /etc/yum.repos.d/docker-ce.repo: No such file or directory
4.系统中尚未配置 Docker 的 yum 仓库。接下来,我将使用阿里云的 Docker 镜像源来添加 Docker 仓库。
sudo wget -O /etc/yum.repos.d/docker-ce.repo http://mirrors.cloud.aliyuncs.com/docker-ce/linux/centos/docker-ce.repo
响应结果:
[ecs-assist-user@iZm5ed6enyjwnqzx18bc3sZ ~]$ sudo wget -O /etc/yum.repos.d/docker-ce.repo http://mirrors.cloud.aliyuncs.com/docker-ce/linux/centos/docker-ce.repo
--2026-07-08 09:22:45--  http://mirrors.cloud.aliyuncs.com/docker-ce/linux/centos/docker-ce.repo
Resolving mirrors.cloud.aliyuncs.com (mirrors.cloud.aliyuncs.com)... 100.100.2.148
Connecting to mirrors.cloud.aliyuncs.com (mirrors.cloud.aliyuncs.com)|100.100.2.148|:80... connected.
HTTP request sent, awaiting response... 200 OK
Length: 2081 (2.0K) [application/octet-stream]
Saving to: ‘/etc/yum.repos.d/docker-ce.repo’

/etc/yum.repos.d/docker-ce.repo     100%[==================================================================>]   2.03K  --.-KB/s    in 0s

2026-07-08 09:22:45 (97.9 MB/s) - ‘/etc/yum.repos.d/docker-ce.repo’ saved [2081/2081]
5.Docker 仓库已成功添加。接下来,我需要确保仓库配置使用阿里云镜像地址,以提高下载速度。我会检查并替换仓库文件中的默认地址为阿里云镜像地址。
sudo sed -i 's|https://download.docker.com|http://mirrors.cloud.aliyuncs.com/docker-ce|g' /etc/yum.repos.d/docker-ce.repo
响应结果:
[ecs-assist-user@iZm5ed6enyjwnqzx18bc3sZ ~]$ sudo sed -i 's|https://download.docker.com|http://mirrors.cloud.aliyuncs.com/docker-ce|g' /etc/yum.repos.d/docker-ce.repo
6.仓库配置已成功更新为阿里云镜像地址。现在,我会使用 dnf 安装 Docker。
sudo dnf -y install docker-ce docker-ce-cli containerd.io
响应结果:
[ecs-assist-user@iZm5ed6enyjwnqzx18bc3sZ ~]$ sudo dnf -y install docker-ce docker-ce-cli containerd.io
Docker CE Stable - x86_64                                                                                      270 kB/s |  66 kB     00:00
Dependencies resolved.
===============================================================================================================================================
 Package                                    Architecture            Version                            Repository                         Size
===============================================================================================================================================
Installing:
 containerd.io                              x86_64                  1.6.32-3.1.el8                     docker-ce-stable                   35 M
 ...
 docker-compose-plugin                      x86_64                  2.27.0-1.el8                       docker-ce-stable                   13 M

Transaction Summary
===============================================================================================================================================
Install  12 Packages

Total download size: 103 M
Installed size: 390 M
Downloading Packages:
(1/12): fuse3-3.3.0-19.1.al8.x86_64.rpm                                                                        1.4 MB/s |  55 kB     00:00
(2/12): libcgroup-2.0-1.0.1.al8.x86_64.rpm                                                                      18 MB/s |  79 kB     00:00
...
(12/12): docker-compose-plugin-2.27.0-1.el8.x86_64.rpm                                                         5.0 MB/s |  13 MB     00:02
-----------------------------------------------------------------------------------------------------------------------------------------------
Total                                                                                                           13 MB/s | 103 MB     00:07
Docker CE Stable - x86_64                                                                                       42 kB/s | 1.6 kB     00:00
Importing GPG key 0x621E9F35:
 Userid     : "Docker Release (CE rpm) <docker@docker.com>"
 Fingerprint: 060A 61C5 1B55 8A7F 742B 77AA C52F EB6B 621E 9F35
 From       : https://mirrors.aliyun.com/docker-ce/linux/centos/gpg
Key imported successfully
Running transaction check
Transaction check succeeded.
Running transaction test
Transaction test succeeded.
Running transaction
  Preparing        :                                                                                                                       1/1
  Installing       : docker-compose-plugin-2.27.0-1.el8.x86_64                                                                            1/12
  ...
  Verifying        : docker-ce-cli-1:26.1.3-1.el8.x86_64                                                                                 10/12
  Verifying        : docker-ce-rootless-extras-26.1.3-1.el8.x86_64                                                                       11/12
  Verifying        : docker-compose-plugin-2.27.0-1.el8.x86_64                                                                           12/12

Installed:
  containerd.io-1.6.32-3.1.el8.x86_64       docker-buildx-plugin-0.14.0-1.el8.x86_64           docker-ce-3:26.1.3-1.el8.x86_64
  docker-ce-cli-1:26.1.3-1.el8.x86_64       docker-ce-rootless-extras-26.1.3-1.el8.x86_64      docker-compose-plugin-2.27.0-1.el8.x86_64
  fuse-overlayfs-1.13-1.0.1.al8.x86_64      fuse3-3.3.0-19.1.al8.x86_64                        fuse3-libs-3.3.0-19.1.al8.x86_64
  libcgroup-2.0-1.0.1.al8.x86_64            libslirp-4.4.0-2.al8.x86_64                        slirp4netns-1.2.3-1.al8.x86_64

Complete!
Docker 已成功安装!您可以使用以下命令验证安装并开始使用:
- 检查 Docker 版本:
docker --version - 启动 Docker 服务:
sudo systemctl start docker - 设置 Docker 开机自启:
sudo systemctl enable docker - 查看 Docker 当前状态:
sudo systemctl status docker
安装Git
1.首先,我会检查是否可以使用系统的包管理器 dnf 安装 Git。让我先查询包管理器中是否有可用的 Git 包。
sudo dnf list git
响应结果:
[ecs-assist-user@iZm5ed6enyjwnqzx18bc3sZ ~]$ sudo dnf list git
Last metadata expiration check: 1:37:14 ago on Wed 08 Jul 2026 09:25:25 AM CST.
Available Packages
git.x86_64                                                   2.43.7-1.0.1.al8
2.包管理器中找到了 Git 的可用版本(2.43.7-1.0.1.al8),接下来我将使用 dnf 直接安装 Git。
sudo dnf -y install git
响应结果:
[ecs-assist-user@iZm5ed6enyjwnqzx18bc3sZ ~]$ sudo dnf -y install git
Last metadata expiration check: 1:38:34 ago on Wed 08 Jul 2026 09:25:25 AM CST.
Dependencies resolved.
===============================================================================================================================================
 Package                             Architecture              Version                                Repository                          Size
===============================================================================================================================================
Installing:
 git                                 x86_64                    2.43.7-1.0.1.al8                       alinux3-updates                     93 k
Installing dependencies:
 git-core                            x86_64                    2.43.7-1.0.1.al8                       alinux3-updates                     11 M
 git-core-doc                        noarch                    2.43.7-1.0.1.al8                       alinux3-updates                    3.1 M
 perl-Error                          noarch                    1:0.17025-2.1.al8                      alinux3-os                          46 k
 perl-Git                            noarch                    2.43.7-1.0.1.al8                       alinux3-updates                     79 k
 perl-TermReadKey                    x86_64                    2.37-7.2.al8                           alinux3-os                          41 k

Transaction Summary
===============================================================================================================================================
Install  6 Packages

Total download size: 15 M
Installed size: 47 M
Downloading Packages:
(1/6): perl-TermReadKey-2.37-7.2.al8.x86_64.rpm                                                                1.0 MB/s |  41 kB     00:00
...
(6/6): git-core-2.43.7-1.0.1.al8.x86_64.rpm                                                                     58 MB/s |  11 MB     00:00
-----------------------------------------------------------------------------------------------------------------------------------------------
Total                                                                                                           61 MB/s |  15 MB     00:00
Running transaction check
Transaction check succeeded.
Running transaction test
Transaction test succeeded.
Running transaction
  Preparing        :                                                                                                                       1/1
  Installing       : git-core-2.43.7-1.0.1.al8.x86_64                                                                                      1/6
  ...
  Installing       : perl-Git-2.43.7-1.0.1.al8.noarch                                                                                      6/6
  Running scriptlet: perl-Git-2.43.7-1.0.1.al8.noarch                                                                                      6/6
  Verifying        : perl-Error-1:0.17025-2.1.al8.noarch                                                                                   1/6
  ...
  Verifying        : perl-Git-2.43.7-1.0.1.al8.noarch                                                                                      6/6

Installed:
  git-2.43.7-1.0.1.al8.x86_64                     git-core-2.43.7-1.0.1.al8.x86_64             git-core-doc-2.43.7-1.0.1.al8.noarch
  perl-Error-1:0.17025-2.1.al8.noarch             perl-Git-2.43.7-1.0.1.al8.noarch             perl-TermReadKey-2.37-7.2.al8.x86_64

Complete!
Git 已成功安装!您可以使用以下命令验证安装并开始使用:
- 检查 Git 版本:
git --version - 配置 Git 用户名和邮箱(首次使用时):
git config --global user.name "Your Name"git config --global user.email "your.email@example.com"
部署微信小程序至服务器
1.在服务器端执行远程克隆仓库指令:
git clone https://gitee.com/你的用户名/仓库名.git
接下来以我的实际项目为例,仅供参考
2.进入 deploy 目录,创建配置文件
cd ~/parallelworld/deploy
cp .env.template .env.production
3.生成密钥
openssl rand -hex 32 # 把输出的字符串记下来
4.编辑 .env.production
vim .env.production
最少需要改这 3 项(其他的可以先默认,后续再配):
SECRET_KEY=刚才生成的那串字符串 MYSQL_ROOT_PASSWORD=你自己设一个密码 DATABASE_URL=mysql+aiomysql://root:你自己设的密码@mysql:3306/parallel_world
注意:DATABASE_URL 里的主机名是 mysql(Docker 内部服务名),不要改成 localhost 或 IP。
5.执行docker指令开始构建项目:
docker compose -f docker-compose.prod.yml --env-file .env.production up -d --build
执行时出现了报错:

解决报错:
原因:国内服务器访问 Docker Hub 超时了,需要配置国内镜像加速器:
sudo mkdir -p /etc/docker
sudo tee /etc/docker/daemon.json << 'EOF'
{
    "registry-mirrors": [
    "https://docker.m.daocloud.io",
    "https://docker.1ms.run",
    "https://hub.rat.dev"
    ]
}
EOF

sudo systemctl daemon-reload
sudo systemctl restart docker
6.等 Docker 重启完成后,再次启动:
docker compose -f docker-compose.prod.yml --env-file .env.production up -d --build
响应结果:
[root@iZm5ed6enyjwnqzx18bc3sZ deploy]# docker compose -f docker-compose.prod.yml --env-file .env.production up -d --build
WARN[0000] The "OSS_BUCKET" variable is not set. Defaulting to a blank string.
WARN[0000] /codedir/aicode/parallel-world/deploy/docker-compose.prod.yml: `version` is obsolete
[+] Running 29/29
 ✔ redis Pulled                                                                                                                           35.1s
   ✔ 897d797d2723 Pull complete                                                                                                           17.8s
   ...
   ✔ 96d30d9fbee8 Pull complete                                                                                                           83.9s
[+] Building 6859.5s (12/12) FINISHED                                                                                            docker:default
 => [app internal] load build definition from Dockerfile                                                                                   0.0s
 => => transferring dockerfile: 629B                                                                                                       0.0s
 ...
 => => writing image sha256:6d92d4c8f2bf63c113298b67647222ef0e94b812949c42fec1e41f1898bae56c                                               0.0s
 => => naming to docker.io/library/deploy-app                                                                                              0.0s
[+] Running 8/8
 ✔ Network deploy_default       Created                                                                                                    0.2s
 ...                                                                                    12.0s
 ✔ Container pw-nginx           Started                                                                                                   12.8s
7.响应中四个容器全部启动成功:
# 验证一下
docker compose -f docker-compose.prod.yml ps
# 然后测试 API:
curl http://localhost:8080/health
响应结果:
[root@iZm5ed6enyjwnqzx18bc3sZ deploy]# docker compose -f docker-compose.prod.yml ps
WARN[0000] The "DATABASE_URL" variable is not set. Defaulting to a blank string.
WARN[0000] The "REDIS_URL" variable is not set. Defaulting to a blank string.
WARN[0000] The "SECRET_KEY" variable is not set. Defaulting to a blank string.
WARN[0000] The "OSS_ACCESS_KEY" variable is not set. Defaulting to a blank string.
WARN[0000] The "OSS_SECRET_KEY" variable is not set. Defaulting to a blank string.
WARN[0000] The "OSS_ENDPOINT" variable is not set. Defaulting to a blank string.
WARN[0000] The "OSS_BUCKET" variable is not set. Defaulting to a blank string.
WARN[0000] The "MYSQL_ROOT_PASSWORD" variable is not set. Defaulting to a blank string.
WARN[0000] /codedir/aicode/parallel-world/deploy/docker-compose.prod.yml: `version` is obsolete
NAME       IMAGE               COMMAND                  SERVICE   CREATED         STATUS                   PORTS
pw-app     deploy-app          "/bin/sh -c 'uvicorn…"   app       3 minutes ago   Up 3 minutes             8000/tcp
pw-mysql   mysql:8.0           "docker-entrypoint.s…"   mysql     3 minutes ago   Up 3 minutes (healthy)   3306/tcp, 33060/tcp
pw-nginx   nginx:1.26-alpine   "/docker-entrypoint.…"   nginx     3 minutes ago   Up 3 minutes             0.0.0.0:8080->80/tcp, :::8080->80/tcp, 0.0.0.0:8443->443/tcp, :::8443->443/tcp
pw-redis   redis:7-alpine      "docker-entrypoint.s…"   redis     3 minutes ago   Up 3 minutes (healthy)   6379/tcp
[root@iZm5ed6enyjwnqzx18bc3sZ deploy]# curl http://localhost:8080/health
{"status":"ok","app":"ParallelWorld"}[root@iZm5ed6enyjwnqzx18bc3sZ deploy]#
8.根据自己的端口号配置安全组策略
9.搜集公网IP,将返回的IP设置在前端的配置文件 config.js 中
curl ifconfig.me
10.编译前端微信小程序,使用微信开发者工具打开构建的 "dist\dev\mp-weixin",然后调试或上传代码
11.执行下列指令可以查询服务器端数据库的邀请码表内容:
docker exec pw-mysql mysql -uroot -p'yourpassworld' parallel_world -e "SELECT id, code, status FROM invite_codes;"
12.测试时微信开发者工具模拟器可以正常使用WebSocket功能进行通信,但是预览模式和真机测试模式都无法在手机端测试,AI告诉我说必须采用 域名+SSL证书 的方式部署网站,才能正常使用通信。
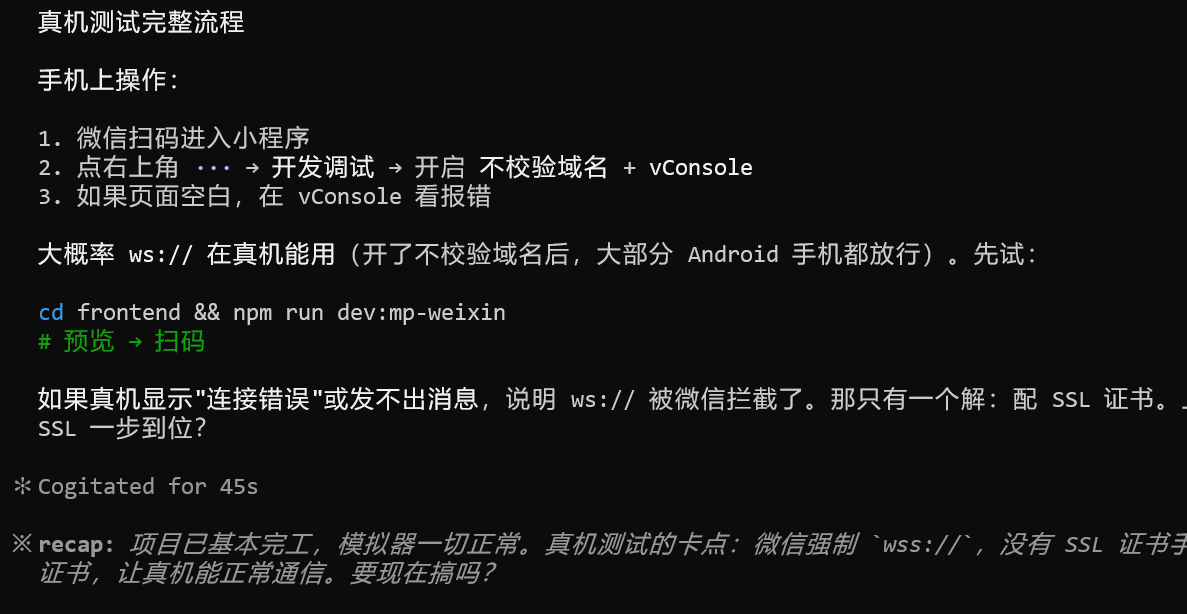
13.关于免费申请阿里云个人测试证书请访问 【如何申请阿里云个人测试SSL证书】
14.为域名绑定SSL证书后,将其绑定至小程序即可正常使用手机端进行通信测试;
15.社交相关的系统需要 BBS专项备案 ,否则将以个人单位发布软件将会被拉入黑名单,同时面临行政处罚。
其他使用到的命令:
docker exec pw-mysql mysql -uroot -p'passworld' parallel_world -e "SELECT id, sender_id, receiver_id, content, created_at FROM private_messages ORDER BY id DESC LIMIT 10;"

docker exec pw-mysql mysql -uroot -p'passworld' parallel_world -e "UPDATE users SET avatar_url = '' WHERE avatar_url LIKE '%placeholder.com%' OR avatar_url LIKE '%via.placeholder%';"

docker exec pw-mysql mysql -uroot -p'passworld' parallel_world -e "UPDATE users SET avatar_url = '' WHERE avatar_url LIKE '%placeholder.com%' OR avatar_url LIKE '%via.placeholder%';"

docker compose -f docker-compose.prod.yml --env-file .env.production down
docker compose -f docker-compose.prod.yml --env-file .env.production up -d --build

sed -i 's/"80:80"/"8080:80"/' docker-compose.prod.yml
sed -i '/"8443:443"/d; s/"443:443",\?//; s/"443:443"/"8080:80"/' docker-compose.prod.yml

docker exec pw-nginx cat /etc/nginx/nginx.conf
